一、Spring注入属性(有参构造和【set方法】)
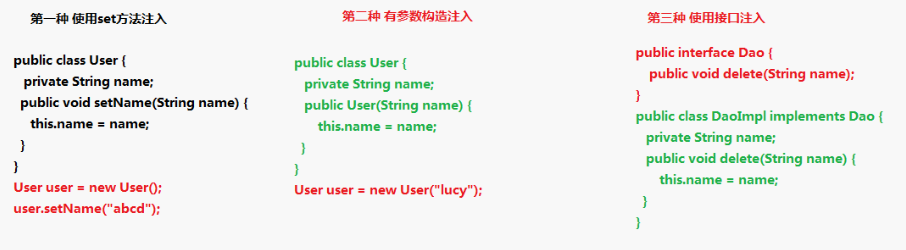
注意:在Spring框架中只支持set方法、有参构造方法这两种方法。
使用有参数构造方法注入属性(用的不多,但需要知道):
实体类
1 package com.tyzr.property; 2 public class PropertyDemo1 { 3 private String username; 4 public PropertyDemo1(String username) { 5 this.username = username; 6 } 7 public void test1(){ 8 System.out.println("demo1-------------->"+username); 9 }10 }
配置文件
12 3 4
测试类
1 @Test2 public void testUser(){3 //加载核心配置文件,创建对象4 ApplicationContext context = new ClassPathXmlApplicationContext("applicationContext.xml");5 //得到我们配置的对象6 //
使用set方法注入属性(重点:这个方法用的最多):
实体类
1 public class Book {2 private String bookName;3 public void setBookName(String bookName) {4 this.bookName = bookName;5 }6 public void demobook(){7 System.out.println("book-------->"+bookName);8 }9 } 配置文件
12 3 4
测试类
1 @Test2 public void testUser(){3 //加载核心配置文件,创建对象4 ApplicationContext context = new ClassPathXmlApplicationContext("applicationContext.xml");5 //得到我们配置的对象6 //
二、Spring注入对象类型属性(重点)
在工作中,action中要new Service,而Service中要new Dao。所以我们现在把new的过程如何实现。
场景:
创建Service和Dao,在Service中得到Dao对象。
实现过程:
1、在Service里面把dao作为类型属性
2、生成dao类型属性的set方法
1 public class UserSerivce { 2 //定义dao类型属性 3 private UserDao userDao; 4 //生成set方法 5 public void setUserDao(UserDao userDao) { 6 this.userDao = userDao; 7 } 8 9 public void add(){10 System.out.println("serivce-------------");11 //之前的做法12 //UserDao userdao = new UserDao();13 //userdao.add();14 //现在我们要把上面这个new的过程交给spring处理15 userDao.add();16 }17 } 3、注入对象属性
配置文件
1 2 34 5 11 12
测试类
1 @Test2 public void testUser(){3 //加载核心配置文件,创建对象4 ApplicationContext context = new ClassPathXmlApplicationContext("applicationContext.xml");5 //得到我们配置的对象6 //
三、Spring注入复杂数据
- 数据
- LIST
- MAP
- Properties类型
1 public class Person { 2 private String pname; 3 private String [] arrs; 4 private List list; 5 private Map map; 6 private Properties properties; 7 8 public void setArrs(String[] arrs) { 9 this.arrs = arrs;10 }11 public void setList(List list) {12 this.list = list;13 }14 public void setMap(Map map) {15 this.map = map;16 }17 public void setProperties(Properties properties) {18 this.properties = properties;19 }20 public void setPname(String pname) {21 this.pname = pname;22 }23 public void test1(){24 //System.out.println("pname="+pname);25 System.out.println("arrs="+arrs);26 System.out.println("list="+list);27 System.out.println("map="+map);28 System.out.println("properties="+properties);29 }30 }
配置文件
12 3 4 12 135
111 62 73 84 95 1014 22 2315
21111 16222 17333 18444 19555 2024 30 31 3233 3834 37com.mysql.jdbc.Driver 35jdbc:mysql:///test 36